10

I've got a handful of oak dowels (ok, a lot) and holes that are both 5/8" in diameter, the problem is that the dowels are just barely too big for the holes.

I'm trying to figure out easy ways to either sand down the dowels or expand the holes. I don't have a power sander and much in terms of tools.

I was thinking of putting the dowels into the freezer to see if they cool off just enough to get them in the holes or otherwise looking for an alternative to manually sanding down the ends of... a lot of dowels or buying a bench top belt sander.

Are there other tricks I can do to get them to fit nicely?

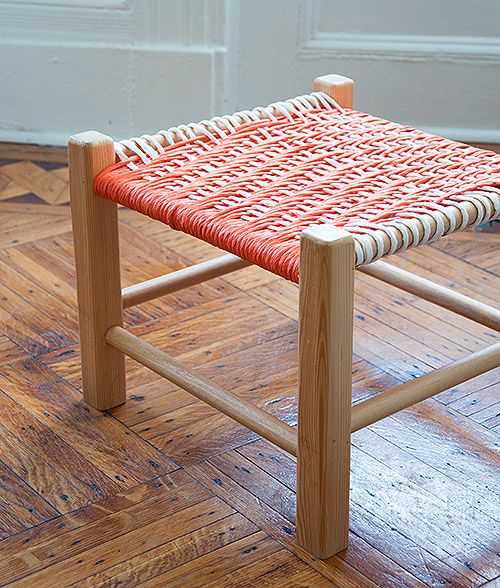
I can't find a good picture of exactly what I'm trying to make, but this shows the general idea (my holes are drilled all the way through, though):

enter image description here

enderland
  • 285
  • 1
  • 2
  • 11

11 Answers11

11

Some 1/2" drills will allow the chuck to open to 5/8". If you can fit a dowel in the chuck, clamp it in the chuck, touch it to a file while the drill is running. Use the drill as a low tech lathe. Just be careful to not touch the chuck with the file.

mikes
  • 11,667
  • 1
  • 21
  • 33
7

Your best bet is to sand the ends of the dowels. A belt sander or disk sander however would not be the way to sand them. There would be way too big of chance of taking off too much or creating flat spots.

The best way, in my experience, is to find a way to turn the dowels and then use hand applied sandpapering technique around the dowel as it turns. The ideal tool for that would be a chuck on a wood turning lathe.

BTW (by the way) You do not want to be pounding and forcing the dowels into the holes with too much force. First off if your legs are as narrow as in the picture you would run a real risk of splitting the legs.

Since you will be having holes that go all the way through you will not have a problem with glue getting forced into the bottom of the hole and preventing the dowel from bottoming out.

Michael Karas
  • 67,833
  • 7
  • 68
  • 153
5

You need to define "barely"!

A dowel should be an interference fit. If you can get it in without using a wooden mallet, then it's not tight enough. Standard advice from northern England (where I come from): "If in doubt, gi'e it a clout."

Snowman's answer above is incorrect for this - you should not have any wiggle at all. Wood glue does not fill gaps, so your joint will only be held by a few millimetres of glue along one side of the dowel, instead of by strong friction forces from the interference fit backed up by the glue. Rycochet's answer gives a good solution to making the tolerances more tolerant, although you probably want a razor saw for this

Of course, if it's tighter than interference-fit territory, then it's time for the next drill bit up.

Graham
  • 2,036
  • 11
  • 14
3

Sanding dowels consistently - to be circular but slightly less diameter - is going to be very difficult without the proper tools.

I would go the route of enlarging the holes slightly. A power drill is a worthy investment if you do not have one already, as is a good set of wood bits with many different sizes.

What I would do here is drill the holes a tiny bit too big, perhaps 11/16" or 21/32". The dowels should fit with a very tiny amount of wiggle room. After testing each dowel for fit, remove it, rub some wood glue around the end, and reinsert it.

3

Rather than changing the size of the holes (and if drying isn't suitable) then I'd suggest slightly bevelling the ends of the dowels, and possibly cutting a notch shorter than the amount the dowel is going in (straight down the dowel from the end, not much more than half the depth) - use a narrow blade (even a hacksaw would be enough).

Once you can get the end of it in, that allows a small amount of flex in the dowel to let it go in far enough that you can use a mallet and block (to protect the wood) and get it in as far as is required.

A very snug fit is good provided the woods are similar - be liberal with the glue.

Rycochet
  • 131
  • 4
2

Given that you own a drill and are doing a lot of holes I'd opt for a rotary rasp and enlarging the holes slightly.

Otherwise your best bet is to cut strips of sandpaper and run it over the dowel ends like you're shining a shoe or taking emery cloth to a pipe. Just be sure to work from opposite sides equally to keep things mostly round.

Matthew Gauthier
  • 3,470
  • 1
  • 10
  • 12
2

I'd buy a 21/32nds drill bit and expand your holes. (I'd be enthusiastic about chucking the dowel in a drill, but I've yet to meet a 1/2" chuck that takes 5/8".)

Aloysius Defenestrate
  • 23,521
  • 1
  • 33
  • 61
2

Saw a thin slot in the end of each dowel, about the depth of the hole. The end will then compress when you push it into the hole. You are using glue, you are not relying on the interference fit to hold the parts together, as you might if you were working with metal. This is a standard and proven technique.

1

Perhaps I am answering the wrong question - but if you want to get a good fit, you might consider using a tapered reamer for the hole as well as for the dowel.

The advantage is that you can get a proper snug fit over the entire length of the hole - and slowly reaming and checking the fit, you can get exactly what you are looking for.

But perhaps it's overkill for your application.

Note - the link I provided shows how you can make your own. Reamers of different taper angles and diameter are also available commercially - but may be too expensive, depending on what you are hoping to achieve.

Floris
  • 131
  • 4
1

The cat perch I'm building has an 1" thick base and 3 1/4" thick shelves. I drilled 1" holes, but discovered the 36" long dowel's diameter is1/16" oversized.

Rather than sand the entire length of the dowel, I came up with a way to ream out the holes.

Take an undersized dowel piece (3/4" x 2" long) and in the center drill out a hole for a 4" long wood screw. The extra 2" length of the screw is the drill bit. Keep the dowel pressed tight against the drill.

Next, tightly wrap the "reamer" in cardboard taped to the dowel. Now use glue to attach the medium coarse sandpaper on to the cardboard making sure the wrap of the sandpaper is in the opposite direction as the drill turn. This will give an even removal of the wood for the too tight holes.

enderland
  • 285
  • 1
  • 2
  • 11
0

It is very possible that the dowels and hole would match perfectly if they had been fabricated at the same humidity. It is likely the dowels were made to be 5/8 at a low humidity and then swell to be just a bit bigger. Likewise, the holes could have been drilled to 5/8 at a low humidity and swelled to be just a bit smaller at the higher humidity. You would want them both stabilized at the same humidity to determine the fit. Let them sit in the same room at around 40% humidity for 2 weeks. See how they fit. Of course whether you have an interference fit or a clearance fit will be determined by humidity. A perfect fit at 40% will become a clearance at 10% and and interference at 80%. However, 40% is a typical humidity average but you can use the average where you are. If you do need to fix this, you want a clean hole and a round dowel. Reducing round dowels has been described. To center and create a new clean hole, you will still need at least a cheap drill. Get a 5/8 forstner bit and a small board or masonite. Drill the board or masonite with the 5/8 bit. Then place that over the holes to be redrilled, that will function as a locator. You will also want a clamp to hold it in place. Do this after the pieces have aclimated to the rooms humidity. The fit should require a mild tap with a mallet to get the dowel in, as described by another. Fine woodworking.

ralph
  • 1