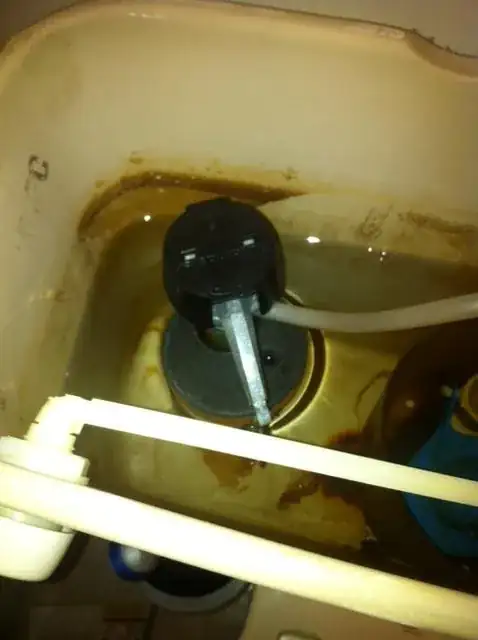
After flushing, my toilet doesn't sense that it needs to refill. See the below image. If I so much as gently touch the gray piece, the toilet starts to refill. Any easy fixes?
Try to clean the valve by following these steps:
I've dealt with the same problem with the same float. In my case it was grit and gunk that got between the float and the cylinder that was keeping it from sliding easily. All I did was turn the water off and clean it up with kitchen/bathroom cleaner and a rag. You clean the top area, then slide the float up, then clean underneath. Chances are you'll feel the binding when you slide it up and down, it will feel like it's catching on individual particles. Once it is clean enough you won't feel that binding anymore.
After reading here and learning how to remove the top part with the arm I found that my arm was binding sometimes and now allowing the float to drop when flushed. I soaked the top assembly in some CLR in hopes of removing calcium or water deposits, rinsed it off and reassembled and for now seems to be working well. Thanks.
I just had this problem. I did what BMitch described in his answer, and found the video linked by Lawrence Kesteloot to be very helpful just to understand what we're talking about. I found that in my case, after removing the cap off of the valve, the float was sliding up and down on the shaft very easily, so that didn't seem to be the problem. However, on the underside of the cap was a rubber seal that was causing lots of resistance. It was easy to pull off this seal and confirm that the arm went up and down without resistance when the seal wasn't there.
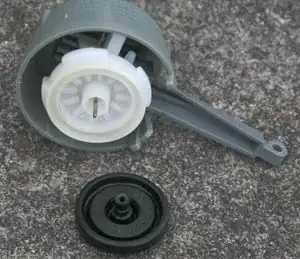
Here is what the cap and arm look like when removed.
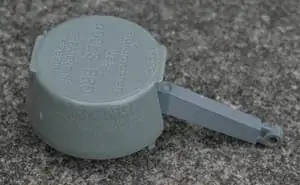
On the underside of the cap, I saw the black rubber seal with a pin that slides through it as the arm goes up and down.

The black rubber seal was easy to remove, and I found that the arm moved without resistance once this seal was off.
I tried cleaning the pin and seal, but I still found resistance when moving the arm. I decided to apply some lubricant. I didn't try searching very hard, but this quickly found link suggests it would be a bad idea to use a petroleum-based lubricant. I decided to use some medical lubricant (generic version of KY jelly) I had on hand. I don't know if this is a good long-term solution, and I suppose silicone lubricant from the hardware store would be a better idea. So far it seems to have worked!
Sometimes, with a fluidmaster, the secondary chain can be too loose to flip the "fork" at the bottom of the floater....get rid of all the slack ...it will flip it and loosen the floater
I had the same problem which caused a lot of frustration. I want to share a simple solution that worked for me. All you have to do is take a small plastic bag (small enough to fit your tank without impeding the other parts of flush mechanism). Fill the plastic bag with a little water (maybe 1/4 cup) + some volume of air, then tie up the bag. So the bag will be like a balloon with water and air inside; tie the plastic balloon on your float. The plastic balloon will float together with your float because of the air. but when the toilet is flushed, the water weight of the balloon will pull your float down, thus triggering the water filling action. This might take some trial and error with regards to the size of the bag and water to air ratio but this worked very well for me.

I disassembled the unit to remove the float from the shaft. It did feel slightly gritty, but even after rinsing both thoroughly they were still binding. I decided to rub a candle on the shaft to coat it with wax. The candle wax is not water soluble, will not degrade the plastic, and did the trick for me.
When you install a new one spray it with silicone spray that you can buy at the home improvement store. This will keep deposits from building up on the parts.
My float would stick, and the tank wouldn't fill. I did everything (almost) to fix it, even a couple things with the stem to make sure it was perfectly vertical to the hole. Nothing worked. After 2 weeks of stress and before buying a whole new thing, I pulled a hail mary pass: I nuked the head-valve with WD-40 for about 5 seconds (mostly to vent my frustration). Simply put, IT ACTUALLY WORKED. As of today, it has flushed about 50 times so far and appears to be working.