9

I have just purchased a new glass cooker hood which is 600mm wide. The gap I have for it is also 600mm wide, though perhaps 599.9mm as it is currently a very snug fit. I am a little worried that the glass will break!

The gap available for the new cooker hood The gap available for the new cooker hood

I cannot move the cupboards. How do I remove a small amount of glass from the new cooker hood so that it fits well, rather than tightly?

isherwood
  • 158,133
  • 9
  • 190
  • 463
James Geddes
  • 633
  • 7
  • 20

9 Answers9

28

Any glass intended for a kitchen is almost certainly tempered. You cannot modify tempered glass. It will explode or disintegrate. Even if it's not, you're unlikely to be successful without specialized tools and training.

You also wouldn't go grinding away at the finished end of your cabinet. That would make a real mess with no easy remedy. Unless you perfectly match a depression to the shape of your new hood, you'll have to deal with surface prep (flat and smooth), stain color, finish sheen, etc. It's a real bag of worms if you expect a professional result like I would.

I think of a hood as an appliance, and of cabinets as part of the home. Almost any time I've visually modified cabinets, or doors, or trim to accommodate something less permanent (or someone had before me) I've regretted it. Instead, look at shortening a cabinet from a hidden point. There's often a filler strip at the corners of the room that could be reduced, or you could pull off a side that's sandwiched against another cabinet and mill that down.

Show us more context for better answers. It may be as simple as re-mounting the cabinets a little more snugly to the side.

isherwood
  • 158,133
  • 9
  • 190
  • 463
18

Glass does not take well to sanding, cutting, etc. It can be done, but not so easily. It is even harder on an assembled large object, as opposed to large flat sheets.

On the other hand, wood and similar materials (e.g., products made from various combinations of wood fibers, glue, etc.) can handle sanding very well, with minimal loss of strength and virtually no chance of sudden failure. A crack in glass will almost inevitably lead to structural failure. A crack in wood, even if it goes quite deep, is not that big deal unless it is in a structural component - and even then often well within the margin of safety.

Sanding will ruin the finish. But due to location, that portion of the cabinet sides will almost certainly always be covered up by a hood. If someday you install a hood that does not cover the entire area that had previously been covered, there are a number of ways of hiding the damage.

manassehkatz-Moving 2 Codidact
  • 139,495
  • 14
  • 149
  • 386
14

If the hood is this kind of arrangement, basically a pair of glass wings extending from a central machine .... my suggestion is return it and buy something different.

No matter what you do it's going to look awful.

There needs to be a wide gap, as shown here, between the hood and the cabinets so you can clean them both. Otherwise you'll get black gunk forming in there that will be visible through the glass and difficult or impossible to clean.

Also ... these glass hoods develop a film of dust-caked-in-congealed-oil that is HIGHLY visible and needs to be cleaned, top, bottom, sides, and rear, constantly --- otherwise they look AWFUL. All hoods have this but on most of them, you can't see the top and the bottom is hidden by the front wall.

If you do ANYTHING to modify the side walls of the cabinet ... sand them, use a router to grind a channel in them, replace them with thinner panels, smash them with hammers ... ANYTHING .... it will look awful.

Just don't.

enter image description here

jay613
  • 49,543
  • 6
  • 70
  • 201
5

There's mentions in other posts of all sorts of changes to the glass, squeezing it in, temporarily moving the cabinets, etc.

Do not compress or attempt to modify the glass in any way

The glass contains invisible, but carefully and balanced stresses within it; watch the 10s segment from the marked time here https://youtu.be/j16GD0xzkhk?t=126 to see a very high-level of how careful cooling during manufacturing causes these stresses, which give the glass its desirable properties, but must remain balanced!

You want to ensure you have not just enough, but extra space with the hood in-place to prevent expansions of the nearby wood (which happens a little naturally with changes temperature and moisture) and the glass hood itself (it will expand a little when heated by the oven) from adding any pressure to the glass

Consider

  • cutting away part of the cabinet such that there is space for the hood (you may be able to route a line or deeply sand away material which will be covered by the hood with a little to spare); you could use something like a Dremel "Multi-Max" for this
  • widening the space permanently by forcing the cabinets apart with some spreader as partially mentioned in a comment .. however, you almost-certainly want a frame that you leave in place after installing the glass to keep the extra space with seasonal expansion
  • returning the hood and obtaining a metal one instead, which may fit more nicely into your space (this may actually save you some time and money covering the unsightly back wall, or could be a topper which acts as the permanent spreading frame from suggestion 2 for your glass hood)
ti7
  • 145
  • 5
2

Depending how handy you are, there's a few answers. Although other answers/comments touch on some of these, I'd like to recap to add my own comments to those, too.

I would also like to see pics of (1) the hood itself, perhaps slightly angled from above or below to get a sense of the 3D form, and (2) the entire cupboard space, like maybe a wide view, 600mm either side of the hood, to get a sense of context, and how rigid or truly fixed the cupboards are likely to be. It would help to add those to the question.

Shaving the edge of the hood

As @isherwood says, stressing tempered glass (which this will be) is a dead end. It can't take it. But equally no need to take it to a glazier either (although definitely safest).

If you truly are missing just 1 - 2 mm of width, I'd buy a diamond faced wheel, and grind one or both edges myself. Low pressure from the tool, and use plenty of slightly diluted washing up liquid (USA: dish soap I think) or other cheap lubricant, in this case, rather than the more usual running water or light oil. (Squirt and smooth onto the surface before grinding). You can get cheap disposable dremel-style diamond faced 60-75mm wheels like this, online, larger will work better as a rule, easier to position and check its smooth.

You only need to shave a little off, and only up to about 30-35cm from the wall where it runs along the cupboard. So from the front it will look untouched and retain its polish. Drag the wheel at a slight angle, so you're grinding not cutting, and so you don't dig in.

enter image description here

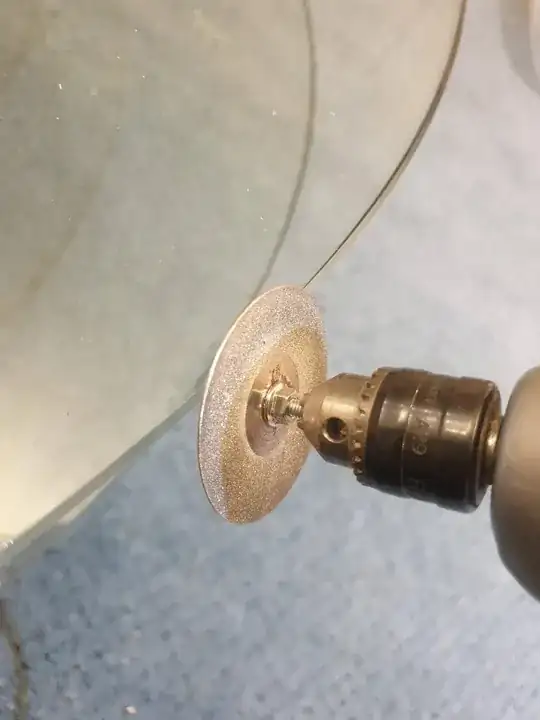
After you have the width right, run/grind the wheel again, this time at 30-45 degrees from both above and below, to ensure the newly shaped edges don't have sharp spurs at the top and bottom, as these might not fit (if the grind wasn't level), or could cut into the wood, or worst case may jam it.

A lightweight wheel like this has virtually no chance at all of cracking or stressing it, and can be used in any household drill.

Flexing the wall of the cupboards

I'd be wary of flexing with a temporary wedge, as one suggestion said. Same reason as above - when you remove the wedge, there will be extra pressure on the glass - and the glass is angled which reduces its ability to handle pressure side to side (in effect its already got a "fold" in it, as well as low tolerance of stress).

If you are going to flex the sides, perhaps use some kind of material with nice rounded ends that can be left in place, if possible, against the wall.

But even then I have my doubts. The board that makes up the back of the cupboards internally/behind may be a problem, though hopefully not. Depends on the material (thin hardboard or actual wood sheet, and whether if it slots in a groove or is nailed/glued (which makes the 4 sides a bit more rigid). They can be either.

That said, the cupboard sides may flex anyway but then I have a more serious concern - you dont want wood permamounted above a cooker, but at the same time any other material is hard to get to the exact width needed, and will prevent the hood lying flush to the wall. And also, more serious again, if you brace the back edges apart, the front edges (30 or so cm from the wall won't be braced apart and may retain their original spacing.

Overall don't like this idea.

Move the cupboards

A millimeter isn't much, and they aren't plastered in place (from the photo).

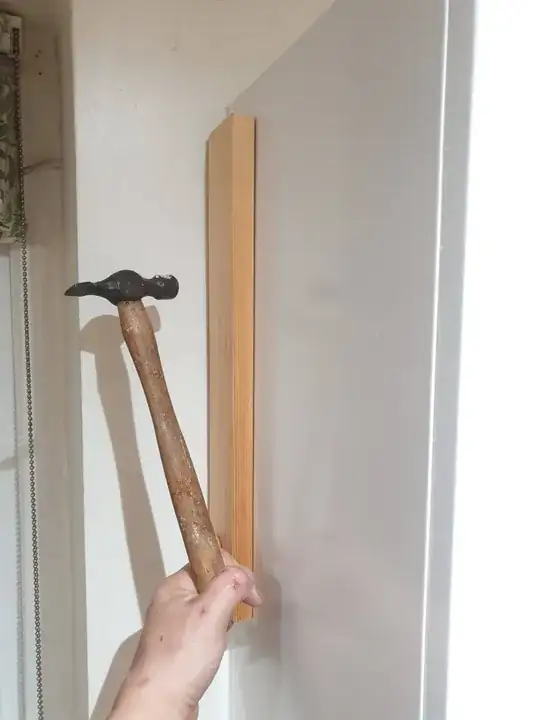
Don't use a rubber mallet. Instead, if they have room to move at all, remove all internal shelves and put a 4x2 inch (100x50mm) piece of wood up against the side of the cupboard to spread the shock and prevent damage, and use a club hammer more towards the top where mounting is expected to be.

The pic gives the general idea, using a light piece of wood and lightweight hammer though. You want heavy hammer/mallet, so it can be hit relatively slowly and still transmit momentum/impulse/shock to the cupboard mount.

Also - important! - the wood should be the full length, overlapping top and bottom corners, not just in the middle as I've shown, so it moves the cupboard as a whole not just bends the side a bit.

enter image description here

Of course don't do this if the finish might be cracked by it. You'll have to judge that. It * shouldn't * ...... if its in decent condition.....

Replace the hood

Easy solution if grinding and nudging across aren't options. As you say, metal distorts a bit easier and certainly with less risk.

Stilez
  • 630
  • 1
  • 6
  • 12
2

First of all: Have you tried it? Since you have already bought the hood you can just lift it in and try if it fits. Maybe your measurement is not entirely correct or the hood is a little bit smaller than promised. If it is too tight a fit and its only about a few millimeters (and there is not a wall directly next to the cupboards) you can try to move them a tiny little bit. Normally there is always a little wiggle room in the mounting of the cupboards. Empty the cupboards, loosen the screws a bit, push the cupboard to the side and fasten the screws again. Maybe even mount the hood while the cupboard is loose.

Before you start sanding the glass you should find a slightly smaller hood in exchange for the bigger one.

Matze
  • 21
  • 1
1

I'd loosen the screws on the back wall of the cabinets and tap them away from the center point of your opening to see if they move. If you can remove the left cabinet, look at the left side of that cabinet, there is usually only contact with the next cabinet at the face frame. You could shave the face frame by 1/8" or so (3mm) as needed to give you a bit of movement. Use a plane for best results. The longer the better. Enlarge the holes in the back wall of the cabinet and remount them to the wall using the existing holes in the wall. Some cabinets are also fastened to the face-frame of the adjacent cabinet. Tighten them up. Life is good.

0

replace the end panels of the cabinet with thinner ones. if you only need a few millimeters that should do the trick.

Jasen
  • 26,920
  • 1
  • 24
  • 46
0

Depending on environmental conditions, consider running a dehumidifier and lowering the temperature in the room and the temperature of the glass. (This would work here in Florida...maybe...). That only solves the initial problem of fit.