13

Short version: I need to run 4" PVC electrical conduit under a 4' wide creek where the water is usually 1-4" deep. Code in this area requires cable in conduit to be 18" deep. I do want to keep it that deep or, if I can manage it, maybe 24" deep so changes in the creekbed will not create any problems for it.

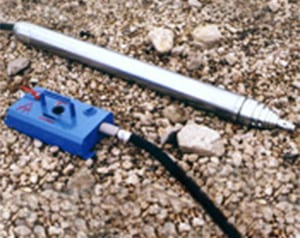
What I can do: I can dam up the creek just upstream and run the entire creek flow through a 4" PVC pipe. (I've done this before.) So that will stop the creek in that area. I also have a tractor with a backhoe, but I'm not sure I can get it down there without it sinking into soft dirt. I have a lateral bore system that requires water from a hose and an electrical drill for it to run a hole through dirt.

My concerns: I expect the groundwater level to be close to the water level in the creek, so when I start digging, I expect any holes to be filled with water. Also, a lot of the creek bed is sand, but I'm not sure how deep that goes. I know with sand, I have to start with a much wider opening than what I need at the bottom. I definitely can't use the lateral bore in a wet hole, since it uses an electrical drill.

Other thoughts: I don't know how fast a hole will refill with water after I pump it out. I've considered that it might be possible to dig the hole I need for the lateral bore system (which needs to be about 1-2' wide and about 5' long and a few inches deeper than the conduit) and use a garbage pump to keep water out of it while I'm using the bore. I also don't know if the ground 18-24" below the creek is firm enough for any hole I bore to remain until I can run conduit through it. The cable is outdoor rated and I know the rule that you assume any underground conduit has water in it, so I'm allowing for the idea that I may have to do some conduit work underwater and just accept water will be in it.

Code issues: Please, let's not get into issues with code unless there's a point that can make a difference. I have a few people answering technical questions for me, including one of the county inspectors. Anything I do on my own I run by him first and he tells me if it's in code or what I have to change. Often he has good ideas, but this is not something most people run into as an issue.

I'm looking for the easiest (and hope that's the best) way to get the conduit down in the ground, as required, in the wet environment of a creek and the groundwater around it. I'm not insisting on using the lateral bore. I don't mind digging. I just don't know how to deal with the wet environment and the likely issues of dirt and sand continually falling back into the hole.

(As a side note, this is tangentially related to this question.)


Addendum: I am not ignoring this or refusing to pick an answer. (Same with the question I link to above.) This is ongoing. I called in a contractor and he looked at the creek and looked at 220' of roadway I had built with heavily packed gravel on top and packed dirt below. This contractor and his men had, within the past few months, put in 10 drains in our driveway, which is part of this roadway, so he and his men personally know how packed it is. He looked over the creek and the roadway and said, "It's going to be easier to go through the roadway..."

But then he got here and his guys said, "Uh, dig up THAT roadway? We want to go through the creek."

When it's resolved, I'll add that info here. For picking the answer, since some include similar suggestions, I'll likely pick the one that considers the most details. (For instance, "Dig a trench through the creek," is not at all helpful. But providing ways to do that and deal with the groundwater and so on is useful and helpful.)

Addendum #2: The conduit is in place. I haven't pulled the wire yet, that'll be in the next few days. I was so exhausted from weeks of testing and digging holes that I hired a contractor I trust to help me with this. I had to do about 190' of trenches other than going under the creek, so I used a trencher and trenched right up to the creek on each side.

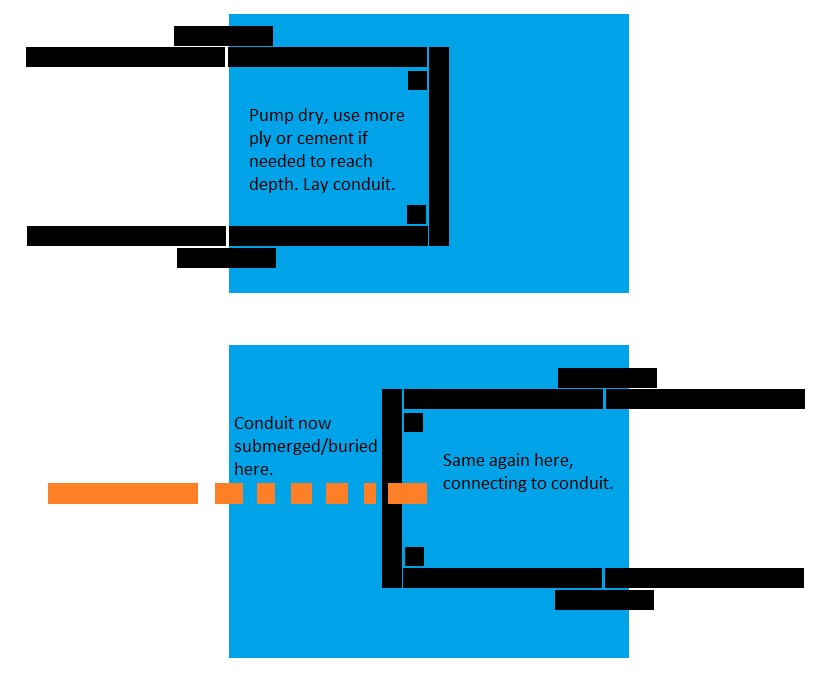
There were some good and creative answers provided. The problem with some is that they left out critical details or made assumptions. (For instance, one side of the creek bank was a 2-3' drop directly to the creek, which would make some ideas harder to do.) Ultimately, we had to block off water at the creek crossing (about 75' upstream) so the contractor and his men could build a cofferdam. They redirected water through a ditch they dug and later filled in. Once the cofferdam was in place, they removed the block at my creek crossing.

I want to point out that @Harper - Reinstate Ukraine included some key points nobody else did. For instance, he included issues with the electrical code. Ignoring those could have let to a failed inspection and a need to redo the whole project. Also, he included an important point that you always assume a conduit is full of water. (I knew this, but it bears clearly mentioning it!)

There were some answers talking about using concrete. While that might be under the creek, or part of the structure, the problem is that in many states the wetlands regulations do not allow any kind of structure in the wetlands without permitting. This can be a problem for local, state, and federal issues. (And you do NOT want to mess with the Army Corps of Engineers on something like this!)

As a side note, it took 4 men working about 9-10 hours on one day to handle controlling the water and getting the conduit in place. They came back another day to dismantle the cofferdam and do the remainder of the backfilling. Seeing how hard they worked convinced me that calling in help to do this was the right thing to do.

Tango
  • 528
  • 1
  • 8
  • 27

8 Answers8

30

Just grab a shovel and have a go at it.

Seriously, given that we're talking about a mere 4 feet (and a bit) and 24 inches aren't that deep either, I can't imagine it being worth the hassle to bring a backhoe in or set up your lateral bore thingy.

Dam it up, put on a pair of wellies, grab a shovel and dig. You should be pretty much done in an afternoon. Even if your trench ends up being close to a metre wide at the top (you know, sand), we're talking about moving roughly half a cubic metre of sand and dirt. That's entirely doable for anyone.

Of course this is all based on the assumption that you won't hit bedrock, but then neither a backhoe nor your water-powered lateral bore tool is going to have any more luck with that.

TooTea
  • 2,407
  • 14
  • 23
14

Sounds like the first thing you need to do is get out there and dig a test hole. Find out what the subsurface soil is like, just how high is the ground water, and just how quickly does a hole refill with water. Whether it's better than you feared, or worse than you imagined, the information will guide your choice of technique.

The lateral bore tool isn't entirely ruled out; you just need a non-electric power source. How about a disposable pneumatic drill? (photo: harborfreight.com)

pneumatic drill

Directional drilling or boring may not make sense here. A surface-launched machine (horizontal directional drilling) will need to be positioned to enter the ground at least 10 feet back from the creek in order to attain 24" depth by the point where it reaches the creek and will need to to that far again on the other side to surface and then pull the conduit back. Due to mobilization and setup costs you probably need to plan on having the drill crew produce at least 200 feet of bore to get an economical cost per foot.

There are other methods apart from the directional drill. One is "pneumatic piercing" also known as a missile or mole. The tool has a reciprocating head and hammers its way through the soil. The operator has some choice as to whether to let the tool pull pipe along behind it or to reverse the tool out of the bore and pull pipe in the reverse direction. The 5" diameter tool weighs about 260 pounds and is 70 inches long so it'll take two people or a tractor to set it in place and a launch pit about 8 feet long. But it'll bore 50+ feet and might be a good alternative to the directional drill. I've used the 20-pound 1.75" diameter version numerous times and the 70-pound 3" size once.. never used any of the larger units though. Unfortunately the cost of these tools puts them well out of DIY territory so you'd have to find a contractor who has one (or possibly a vendor who sells them may also offer them for rent). (photo: www.tttechnologies.com)

grundomat

For such a short distance it seems like your most economical choice is the traditional open trench. Dam the creek, use a dewatering pump if necessary, and shovel it out by hand or with the help of a chain-style trencher. Because the surface traction is likely not good it might be necessary to help a trencher along with a chain/winch/come-along attached to an anchor such as a tree or that tractor you mentioned.

A drain spade is my new favorite tool for open trenching. It has a long but narrow blade that really helps get the depth that's needed while avoiding moving more material than necessary. (photo: www.lifeandhome.com)

drain spade

Greg Hill
  • 35,866
  • 42
  • 91
8

One option that may make this much easier is to hire a local horizontal directional drilling company who can drill and then pull a conduit under the creek.

jwh20
  • 23,628
  • 2
  • 34
  • 65
4

You could do a "cut and cover".

Using plywood, make a roadbed for your backhoe to get to the dig site. Of course, you'll only need to do this for the portion of the journey that is soft enough that you're worried about damaging the ground and/or getting the tractor stuck. You'll only need enough for the length of the backhoe plus a new piece to drive onto. Then "just" pick up the last cleared piece and move it in the direction you're driving. i.e. you don't need a half-mile road of plywood, just enough to get the tractor down there. I put "just" in quotes because I know this will be a lot of work... Once into position, use a couple of sheets underneath the stabilizers to keep them from sinking into the soft ground.

  • Prepare your entire length of conduit
  • Dig your trench to ensure your desired minimum 24" of cover (I agree, more never hurts)
  • Once you've got the trench dug, drop the completed conduit in place.
    • The trench will, likely, start filling with water, so you may have to push the conduit down and drop a few rocks on it to hold it down.
  • Start back filling before the whole thing floats away.

At each exposed end, connect your newly buried conduit up to the existing run, and have fun pulling your wire.

I'm not sure what you're pulling through 4" conduit, but that should be plenty big enough for this and any/all future projects. For this much effort, "go big or go home" certainly seems to be a good game plan!

FreeMan
  • 48,261
  • 26
  • 101
  • 206
4

You could dig the trench in sections and use concrete forming cylinders, placed vertically, as trench plates.

These tubes can be lowered as you dig down, and pumped dry if water becomes problematic while you dig.

The round shape provides the kind of pressure support not possible with a rectangle: they are designed to hold the hydrostatic pressure of a 6ft column of wet concrete from the inside, but they are quite strong against pressure from the outside.

Arrange them side by side (touching), and when done digging you can drill through the cylinders to run the conduit. Or pre cut an opening at the bottom to run the conduit and later lift the cylinder. They can be cut with a box cutter, a drywall saw or of course a reciprocal saw power tool.

For a 4' creek crossing you'd need 4 such cylinders of course. A 12in diameter comes in 4 or 6 ft lengths, so you'd need two tubes total for 24in digging depth.

Divert the creek flow around the tubes, and work in sections if needed. The shape of the tubes will provide the required strength against the static pressure of the mud.

Digging 2ft deep inside a 1ft tube is not easy, but this could be a workable solution. Also, time is of the essence as they will not hold up forever against water.

These tubes have diameters up to 12in in box stores, but are available in larger diameters as well. The 12in tube weighs 7lbs for 4ft length.

enter image description here

P2000
  • 16,250
  • 1
  • 33
  • 55
4

First, the conduit must be fully constructed end to end, signed off by inspector, backfilled and tamped before any wires are placed in the conduit. NEC 300.18.

People accustomed to Romex or direct burial are often surprised by this, because it's common to use "a stick of pipe" or even conduit bits for physical damage protection such as a stub-up. When it's all conduit, the rules change. Anyway, trying to do it wrong makes construction very messy, and forces you to do it all in one day or risk theft of wires. When you build empty conduit, you can segment your work as you please.

Put it this way: Feel free to finish the conduit job, inspect and landscape before you even buy the wire. That's especially a good idea right now, as wire prices have now tripled from normal, what is going on??? And noting in comments you said sometimes projects get back-burnered for awhile. Prices can only get better.

Obviously since pulling will be involved, this requires constructing the conduit to Code, including limiting number of bends to the absolute minimum between access points. Note that conduit can have a gentle curve. They also make shallow bends like 22.5 degrees, or using two 45s for an S-bend instead of two 90s.

One advantage to crossing on a bridge: you can have a compact, inline "conduit body" attached to it as a useful pulling point, thus cutting your bends and pull in half at the cost of two 45 bends to come up to the surface.

Anyway, for the low section that will span an underwater trench... you can glue up that section of the conduit on the surface, and then just flop it into the trench. To get it to sink, just fill the conduit with water. Conduit is assumed to be 100% full of water 100% of the time. Water protection is in the wire insulation.

The only complication is that a conduit full of water will be hard to suck a pulling rope through using the "shop vac" method. However, you can fish it using fishing tape, or you can build the pipe around a pulling rope.

Harper - Reinstate Monica
  • 313,471
  • 28
  • 298
  • 772
4

Do the job in two parts. First, the left hand 2' of the creek. (The other half is identical).

Take some 18mm (3/4") plywood. Don't worry about waterproof material, it won't be there long enough for that to be an issue.

Part 1

Cut it into strips. You'll want 5 pieces, each about 2' wide and 4' high when placed on edge, and another 2 pieces about 1' wide and 4' high. You'll also want about 2 lengths of 4' of 2x2" timber

The soil is soft. Hammer the pieces into the creek, blocking half its width, and another 2' back past the bank., using the 5 x 2' pieces. You should be able to go deep, a fair way into the creek bed. Use a block of wood on the top edge so you don't crush the plywood when you hammer it in. Hammer the 2x2 timbers into the corners. Screw the pieces together - you wont be able to screw below the bed but it won't matter, the materials rigidity will do most of the work and you can fix any leaks later.

enter image description here

Now the creek can still flow freely on the other half, so there's no change to water pressure. You've isolated a 4x2' section half bank and half creek. Pump and dig it out. If needed, hammer the ply deeper, brace it except for where you're digging, or do another round of ply just inside it, to go deeper. But you should be able to get deep enough below the creek bed., and while it'll waterlog, the pump will clear it enough to do the job. You'll get wet but you knew that :)

If desperate, take raw cement powder, and push it in heaps along the edges, thick enough that it can't wash away. Also mix it into the mush of the exposed creek bed. Like 2-4" thick. Its an old trick to create a waterproof or dryish mix when a trench bottom is prone to flooding or soaking, and a pump can't fix it all.

Now lay conduit on that half.

Part 2

Now do the same, with the other half, except your end piece, make sure its over the conduit not blocking it. That way you can make the join. Then unblock the first half, and block the 2nd half.

This time, when you come to lay conduit, lay it connected to the 1st half end. It'll be water filled,but you can fix that - the far end is on the bank above the waterline so once it empties, and the 2nd half of the creek now being exposed to air, it won't refill.

Done.

Comment

The advantage this way is, the creek is never rerouted or blocked enough to be an issue (if it is, enlarge the opposite width temporarily!) You don't need to buy, or cut into, any heavy forms.

You also wont get slumping/washed debris or undercut filling your dig - I've used this trick myself (plywood hammered in, then cement mixed with the slurry to handle the water coming in under) more than a few times to do groundworks and foundation trenches 4-5 feet below ground level and 2-3 feet below the waterline, and would trust it at least 1-2 feet more below the waterline from what I've seen.

It'll easily do the depth you want.

Update

If worried about cement washing out, use this stuff, or equivalent. Expensive but both waterproof and rapid. Of the two rapid is the key, a cement that sets in 10-20 minutes is ideal for the job:

enter image description here

The comment makes a valid point about code checking. But the cement is inside, and placed and mixed in when there's no or very little water flow. A trickle rather than a flow. If its able to wash and escape before setting, then you need to block the flow more.

Stilez
  • 630
  • 1
  • 6
  • 12
1

I have seen articles where someone uses a hose, a length of pipe, and one of those high-pressure nozzles to blast a tunnel under the ground. The trick here is that the "pipe" you use would be your actual conduit. So you turn the water on, blast and push, and when you're done, pull the hose back. (To make this work, I think you'd need a vertical hole on each side of your stream for entry & exit.)

sribe
  • 101
  • 1