9

I was replacing three old switches with two new switches a timer. The prior owner's install was as follows:

  • White wires all bundled
  • One black wire (hot) running across all three switches Original wiring with one of the black wires removed from the first switch

The switches control two lights and a fan. From left to right A = Fan light; B = Fan; C = Shower light

New switch: https://www.lowes.com/pd/Eaton-Single-Pole-White-Compatible-with-LED-Rocker-Light-Switch/1001438232 New timer: https://www.lowes.com/pd/Eaton-Digital-Countdown-Lighting-Timer/1002943550 (For some reason, the website doesn't show the neutral wire available on the timer, but there is one on the actual device.)

Here's what I did (using all new wire nuts):

  • Cut the black wire that had run across all three switches and pigtailed those connections to the new switches from a wire nut. These run to the top terminal for each switch and the black wire on the timer.
  • Pigtailed ground and grounded everything with bare wire
  • A: Red to the fan light to bottom of a new switch for the fan light
  • B: Black to fan attached to red timer wire; Pigtailed a white wire from the neutral bundle to the timer's neutral
  • C: Black to the shower light to bottom of new switch
  • Reordered the switch positions such that original positions left->right A B C; new is C A B.

Both of the new switches operate the reverse of my expectation with the off/on positions reversed. The timer operates as expected. What should I have done differently?

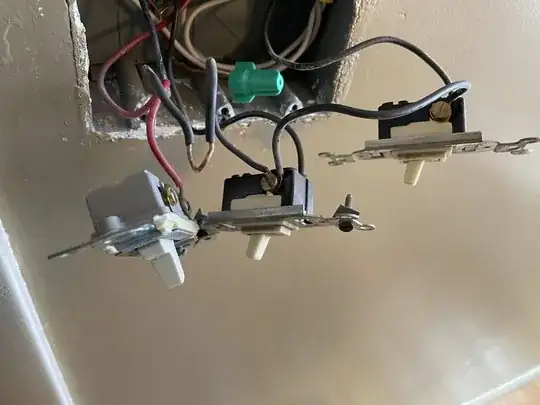
These images are with circuit on and new switches with hot on top and no voltage on bottom terminal. (Also confirmed with multimeter.) enter image description here enter image description here

In this orientation, all appliances are off: enter image description here

isherwood
  • 158,133
  • 9
  • 190
  • 463

2 Answers2

18

This screen shot is from the Lowe's link you provided:

Image of the switch with an arrow pointing to the word "TOP" embossed on the yoke

Take a look at your switch. I'm willing to bet that it says "TOP" at the bottom as you've installed it.

Unscrew the switch from the box, turn it over, screw it back in.

FreeMan
  • 48,261
  • 26
  • 101
  • 206
11

TL;DR Turn the switches around

With traditional toggle switches, a regular (not 3-way) switch will have embossed "ON" and "OFF" which tells you how to orient the switch. However, a Decora style switch normally has no external indication of proper orientation.

There are no standards in switch screw locations. I picked the first Decora style switch I could find on the Home Depot web site. The Leviton Decora 15A Single Switch has a picture which clearly shows screw terminals on the right (when looking at the front of the switch) and ground on the upper left. Based on your pictures, your switches appear to be similar, at least in screw configuration.

Leviton

So turn it "upside down" and it will actually be "right side up" and solve the problem.

I just checked the link (didn't notice it before) for your actual switch, and it has the exact same configuration as the Leviton. See the pictures on the Lowes' web page - ground screw top left, hot/switched hot screws on right. Flip it!

Note that with a simple (not 3-way, not "smart", etc.) switch there is no difference between the two main screws. So putting hot vs. switched hot top/bottom or bottom/top makes no difference.

manassehkatz-Moving 2 Codidact
  • 139,495
  • 14
  • 149
  • 386