8

I am trying to deal with the smell problem in my house and have decided to remove all of the existing insulation under my attic floor. The house was built in 1959 and they used high quality plywood for the attic floor so I don't want to damage it.

I would like to pull up each of the boards, one at a time, clean out all of the old insulation (combination fiberglass bats and gross cellulose) in each of the trenches, then add new insulation and add the existing plywood piece back on top and use screws this time.

What I can't figure out how to do efficiently is remove the nails to get the board up. It's very time consuming and I understand why contractors don't even attempt to save the wood. Is there are tool that I can buy to make my job more efficient?

I know there exist pneumatic tools to push out nails but I think they are for going in the opposite direction. I also know that once I get a nail out using a 2x4 as a level helps a lot (there's a youtube video I got that tip from). Any other ideas? I don't mind spending a few hundred dollars on tools to be able to save this wood.

isherwood
  • 158,133
  • 9
  • 190
  • 463
guidoism
  • 183
  • 1
  • 5

8 Answers8

12

There are all sorts of pry bars available for prying up nails. My favorite style for a job like you describe is this style, a claw nail puller:

Catspaw claw nail puller tool

You pound one end of the prybar underneath the nail head, and then pry up the nail. You will make some amount of damage to the plywood right around the spot where the nail is, but the plywood is still plenty good to put back into place and nail it down with a new nail in a slightly different spot.

Fredric Shope
  • 4,955
  • 4
  • 22
  • 35
Ken Carlson
  • 1,778
  • 4
  • 17
6
  1. Screw through the plywood with structural screws and then pull upwards on those screws.

    I would be worried about ceiling damage.

  2. Drill out the nails (or drill or grind the nail heads off) then use a pry bar or suggestion 1 to finish the job.

Toby Speight
  • 481
  • 3
  • 11
Jasen
  • 26,920
  • 1
  • 24
  • 46
6

I wouldn't try and remove all the nails in place. That will take forever. I would pry up the plywood, then remove the nails.

Here is what I would do: Pick up :

  • one good long prybar
  • one good short prybar like a stanley wonder bar
  • a cats paw bar
  • clawhammer
  • some scrap wood for leverage and prying against.

Find a edge of the plywood where it is exposed and hammer in your short bar. work on the joists (use the existing nails to locate). work parallel along them and get one edge up. Once you have some clearance use the long prybar to work the rest of the plywood up. Go slow and work alternately along each joist to gently get the board up without bending it too much. If you can, try to pry right at each nail as you gain access to it. Once it is up, flip over the plywood and hammer the nails back out. Flip back over and use the catspaw and clawhammer to pull them out.

Once you have one board out you should have more clearance to work on the other ones.

If I didn't have access to a good plywood board to start with, I would cut a clearance hole and use that to get the first board up. Then patch or replace after.

Bill
  • 397
  • 1
  • 5
4

You could try the short arm of a Japanese nail set (eg Lee Valley —- somewhat of an endorsement) to pound the nail through the ply. It leaves a slightly bigger hole than you had, but way less mess and effort than a traditional cats paw.

Aloysius Defenestrate
  • 23,521
  • 1
  • 33
  • 61
4

I've used these before; my dad had a couple ancient ones: https://www.acmetools.com/crescent-19in-sliding-nail-puller-56np/037103360687.html It's a slide hammer along with a pry bar basically - you position it over the nail, slam down the slide hammer a couple of times to get the jaws beyond the head, and then pry it out(or at least up enough to get access with a conventional bar).

They work pretty well, as long as you don't mind the small divots around each nail... But you kinda get those anyway with the nail-puller bars.

Macrobb
  • 41
  • 1
3

As Ken Carlton says in his answer, "There are all sorts of pry bars". The first two photos below are Amazon's first results for "set of pry bars" and the third photo is "set of nippers". You can buy all three sets for under $100. You don't need so many, if you want to poke around and buy a small and medium one from the first set and a medium one from the last set (the one without the red handles, but an extra claw instead) .... just start with those three pieces.

The different thicknesses of metal, bite angle of the teeth, open angle of the claws, and angle and shape of the levers will all help you in different scenarios.

You'll develop a couple of favorites and with practice you'll be able to remove most of the nails without significant structural damage to the plywood. You will mar the surface. With the pry bars in the first set, there's a claw at each end and one in the middle. The middle one has its uses, but also the greatest potential to damage the surface as you are using the pointy end of the bar as the lever.

This is a time-consuming approach, and you wouldn't normally use it on an entire plywood floor ... but plywood has become insanely expensive. Three sheets of the worst junk you can find costs more than all the below tools combined. So if you have time ... you'll get good at this pretty quickly.

enter image description here enter image description here

jay613
  • 49,543
  • 6
  • 70
  • 201
2

Here is my technique for dismantling pallets while causing minimal damage to the wood boards, the process is nearly identical for plywood.

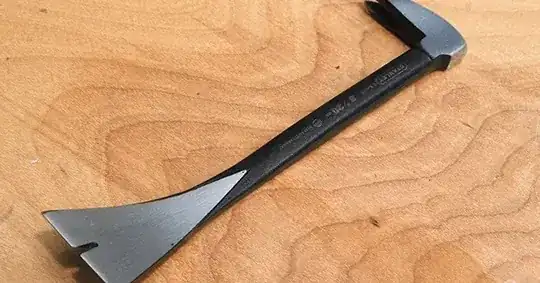
First, you'll need several pry bars, the kind with a very flat edge. The sheep's foot ones only really work well once the nail head is exposed - getting the boards separated first is the hard part. If you wanna be extra, you can take one of those flat edge ones and ground it even thinner, like half a mm (you don't want it razor sharp cause it will cut you and the wood too easily). I find the stock pry bars a tad too thick and this mod makes getting into the gap between the decking and the joist much easier.

prybar

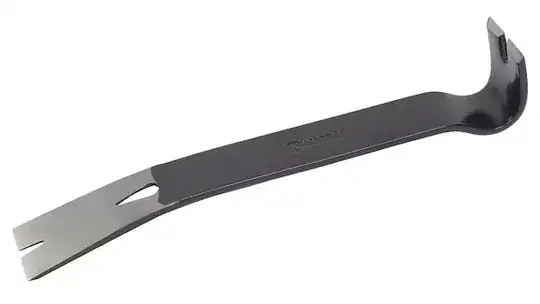
This kind is great because the handle is stout for hammering. Wedge the blade in between, get it as parallel with the joist as possible, hammer gently until it seats on the nearest nail, and pry. If you cannot get enough purchase on the plywood without crushing it, this is where the sharpened edge comes in. Hit it with the hammer hard and you should be able to cut right through the nail (watch your fingers, wear thick gloves, it'll jump forward when it gives way). You can now get the pry bar deeper for more surface area on the plywood to pull with more force without crushing the wood.

Once you get a corner started, keep wedging around, inserting those flat style pry bars, splitting wedges, or even angle cut blocks of wood.

flat style pry bar

It kind of creates a virtuous cycle, once you get some of it lifted, you can get more leverage, which lets you pull more nails, get more surface, etc, until the whole piece just pops off. Watch the protruding nails!

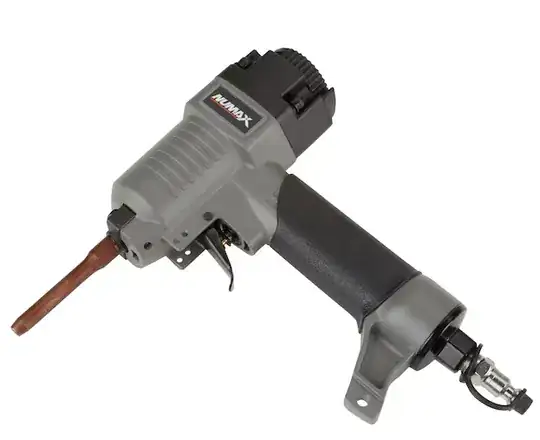
I recommend getting one of the pneumatic un-nailers/punch tools if you want to pop the old ones out. You'll want to drape a heavy cloth over a bucket or wide tub to catch the ejected nails, they go flying. Also there's a trick if the sharp pry bar trick fails to get purchase: use the punch tool to drive the nail head THROUGH the plywood out the other side into the joist. Exactly as if you were using a nail gun. It'll create a 1/4" hole in the plywood, but the nail will no longer be able to hold the plywood to the joist. You can do the same with a manual punch but the pneumatic punch is very fun.

enter image description here

DeusXMachina
  • 141
  • 3
1

Use a claw hammer:
A typical modern claw hammer

The inner claw edges are pretty sharp; if the nail head is slightly above the plywood, just slide the edges under the head until the claw is tight, then pry the nail out.

The further in you go in the slit, the narrower it is.
Use a hammer with a relatively long slit: You can choose to not slide the nail all the way into the slit, reducing the force you apply.
Also, varying at what point exactly the nail head sits in the slit lets you control the angle at which the nail is pulled out, which helps reduce the pressure and damage on the plywood.

If you can, find a claw hammer that is asymmetric, i.e. one claw is longer than the other.
You can use that sideways, if a nail head sticks out at one just one side.

You can use a second hammer to gently pound the claw hammer under the nail head.

Nippers are unsuitable: The edge needs to be sharp, not somewhere inside.

Prybars would work but seem to have much shorter slits, that's less flexible for varying the leverage point.

Screwdriver-like nail pullers are just bad, they press on a very small area, and they grip the nail head only on one side; I can imagine that combining two of them might be pretty flexible for the difficult cases where a claw hammer does not work. The downside is that you can't hammer them into place; so I guess they are more the tool for people who do this kind of work often enough that having a specialized tool for each situation makes sense.

Claw hammers to need a relatively large free space around the nail to work, so they do have their limits, too.
However, "plywood" sounds like lots of free space near to the nails, so that's why I'd prefer that.

toolforger
  • 127
  • 2