Husband was installing some cabinets in our laundry room and thought he was drilling into a stud, but turned out to be the dryer duct. So there are a few holes in it now. Can we leave this as is or do we need to remove drywall to repair? We’re obviously novice DIY’ers.
Asked
Active
Viewed 5,620 times
6 Answers
42
You can leave it - if you want to turn a small, easily fixed problem NOW into a big, messy, rotten, moldy mess LATER, after the duct has pumped lots of warm moist air and lint into the wall for weeks, months, years or decades.
Learn to open up and then repair drywall, it facilitates many home repairs. Plenty of prior questions and answers here on the subject. Doesn't even have to be a very good-looking repair if it will be behind a cabinet.
Ecnerwal
- 235,314
- 11
- 293
- 637
23
Go buy an oscillating tool with a general purpose blade. If you're doing DIY projects you're going to need it. Buy a corded one unless you own a ton of cordless tools and have a ton of batteries. Other things for your patch include
- Mesh drywall tape. Traditional tape will be harder to use here
- Drywall screws or nails
- Vinyl spackle (buy a putty knife set if you don't own one already)
- Sandpaper or sandpaper block (220 grit will suffice)
- Foil tape (down the ductwork/HVAC aisle). Do not use duct tape here
- Paint for the whole room. Might not need this if the new cabinets will cover the hole, or you've recently painted and have a decent amount of the original paint left over
Here's how to use your new stuff
- Find the center of the studs on either side of where you need to open the wall. Use a drill with a 1/16" bit if you need some help.
- Mark a line along the studs where you can cut a sufficient hole to see your damaged duct. Try to keep this straight and ideally make it as square as possible (i.e. use a level to draw lines)
- Use your oscillating tool to carefully cut the drywall. Basically I like to score the lines and slowly work into the drywall. On the studs, you may bump into screws/nails. Be sure not to cut too deeply into the wall between studs either, or you can damage the ductwork (electrical should be too deep to hit). Don't rush this step. Take your time to work the lines until you can cleanly remove the drywall section. The goal here is you want to be able to put this section back in when you're done.
- Mark (or remove) any nails/screws you encountered. Just use a pencil to mark the remaining wall.
- Remember the foil tape? You're going to cut some tape and slap it over the holes in your duct. Don't skimp, cover them with longer sections if needed.
- Fit your drywall back over the hole. Drive some screws/nails in to secure it.
- Mesh tape the cuts. Then spackle to cover the tape
- Once dry, sand it smooth. It might not be flat, but it shouldn't be terribly noticable
- Paint (if needed)
Congrats, you repaired the duct and opened and closed your wall.
Machavity
- 26,498
- 8
- 44
- 100
8
A couple of holes probably wouldn't create large-scale issues, but if left alone, there is a potential for undesirable side effects to occur, especially over the long term.
- Dryer exhaust is filled with lint particles and can contain harmful gases, including benzyl acetate (electric/natural gas) and carbon monoxide (natural gas), negatively impacting breathing and overall health.
- Moisture from the drying process averages between one and two gallons per cycle. Add all that dryer heat, and mold will likely eventually form, especially in a wall cavity with minimal air circulation.
- Compromised dryer ducts can negatively impact the machine's performance and increase energy costs.
Read More: Health Effects Of A Dryer Vent Discharging Inside A House
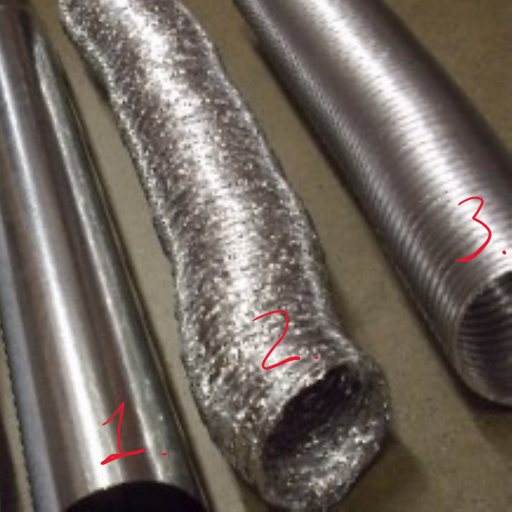
Fortunately, dryer duct is easy to fix, so repair is likely the best course of action. Open up the drywall enough to access the holes in the duct. For solid duct (1), cover each hole by cutting a square piece of aluminum or sheet metal and securing it with sheet metal screws aluminum HVAC tape. If you have flexible (2) or semi-solid (3), use aluminum HVAC tape (not duct/duck tape) to cover and seal off the holes. Patch the drywall, and everything will be as good as new.
NOTE: @CrazyArm pointed out a potential fire hazard if the screw tips penetrate the existing duct. So, I updated my answer to advise using aluminum HVAC tape to secure the patches over the holes.
Peter - Reinstate Monica
- 482
- 3
- 9
killshot13
- 183
- 8
2
Don't make a mountain out of a mole-hill.
- Enlarge the hole(s) so that a straw from fire-blocking canned foam can fit through the wall and reach the ducts
- Apply the foam around the outside of the holes. Try to get as little as possible inside of the duct
- Patch the drywall holes if necessary; I assume you can skip this since cabinets will be covering this area
Great Stuff brand is quite popular and very common.
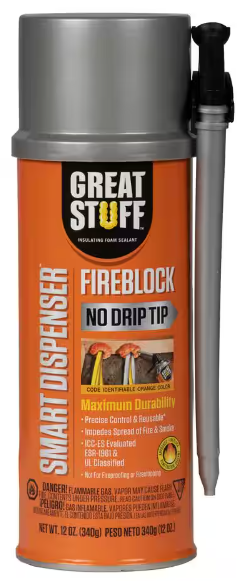
From the manual:
Do not expose to temperatures above 240°F (116°C).
Dryers typically range from 120°F to 160°F.
MonkeyZeus
- 17,328
- 2
- 27
- 64
2
A dryer vent with a hole could put a lot of warm wet air into the wall cavity and the troubles that could make could become more expensive to fix as time passes.
I suggest you take advantage of the hole that was drilled to create access to the hole in the duct. You'll need a tool called a hole saw. Its a sawtooth edged cylinder that goes in the electric drill. It has a pilot drill in the center and it cuts a circular hole around it. To cut only the plasterboard, I suggest buying the lowest cost kind that is a backing plate with thin steel blades for a variety of hole sizes. Using it with only the largest one will make something like a 2" diameter hole between 1/4" and 1/8" before the plate would touch the wall surface. The plaster circle will be stuck in the hole saw. It a safe place to keep it. Don't bother retrieving it until you're ready to close the hole.
One hole in the dryer vent will now be 1/4" in diameter from the hole saw's pilot drill. All of the holes can now be repaired. How depends on what the vent is made of. An over-the-top home repair hero might put 1/4" blind rivets in a sheet metal vent, but some aluminum tape, the kind that's real metal with sticky adhesive, not coated cloth, should be good for most dryer vent materials, which should all be metal. If its an old style vinyl coated cloth dryer vent you can patch it with either aluminum tape or coated cloth duct tape, but it really should be removed and replaced before long.
If the vent is plastic pipe, either white PVC or black ABS, its a plumbing vent. The holes can be filled by applying pipe glue and allowing it to dry and shrink a few times until the hole is closed and stays closed.
To close the plaster hole, we need to make it so the plaster circle doesn't fall into the hole before we smooth it over. that can be done by using some white glue or yellow glue, some thin wood strips and a couple of rubber bands or some string. The easiest thing to get at the store is a couple of paint stirring sticks. Cut 2 sticks in half to have 4 6" sticks. Double over one rubber band on 2 sticks so the rubber band will be tight at 1/2" spacing. Put glue on one side of one stick per pair, but not the center 2 inches. Maneuver the stick into the hole to that it glues to the back side of the wallboard and is held in place by the other stick on the outside of the wall and the rubber band. After the glue has dried cut the rubber bands and discard the 2 half length paint sticks leftover. Now remove the plaster disc from the hole saw and put glue on the back side of the plaster disc and the back side circumference and glue it into the hole. A few paper clips around the perimeter can center it and wedge it in place as needed.
After the glue dries spackle, sand, and touch up the paint.
It takes almost as long to read as it does to do if you already own the supplies.
If you ever have to make any larger holes to repair it, you would want to have noticed if if your wall was skim coat plaster over moisture resistant wallboard or joint compound over ordinary wallboard. There's no shortage of videos showing how to repair either type. Joint compound soft, easy to sand, and can always be wetted to re-shape if necessary, but it shrinks so you have to apply it several times. Plaster hardens and is difficult to sand but you only have to do it once and the harder surface isn't dented by routine home mis-steps. It does take a few minutes to learn how to trowel wet plaster and its easier to learn if you can chuck your 1st attempt in the trash can.
Oliver Street
- 141
- 3
0
You might just put a self-tapping screw in each hole. That should solve the problem with minimal cost and effort. You can buy these screws with a washer. Just search on "self tapping screws with rubber washer".
Yehuda_NYC
- 1,399
- 13
- 35
- 52