6

I will be tiling a backsplash in my kitchen. Currently there is none, and the new backsplash will cover areas that currently have electric sockets.

So my question is this do you:

  1. Remove front cover of socket, tile slightly over the back box and then put the front back, will now require longer screws because of gap between front and back box)

    or

  2. Remove front cover of socket, pull the back box out slightly so the front of the backbox is flush with the front of the tiles, tile up to the edge of the backbox, screw front plate back on to the front of the backbox.

Paul Taylor
  • 225
  • 2
  • 7
  • 21

3 Answers3

5

Most electric receptacles are installed into the box with long screws that have a special backing washer. The washer is there to hold out the receptacle, so you can loosen the screws until your receptacle is flush with the outer surface of the wall. The face plate is then fastened to the receptacle. In the US, the screws from the receptacle to box are at the top and bottom of the box (or left and right if mounted horizontally) and the faceplate attaches in the center for a typical outlet, and at top & bottom for switches, GFCI outlets, and many newer-style outlets and switches.

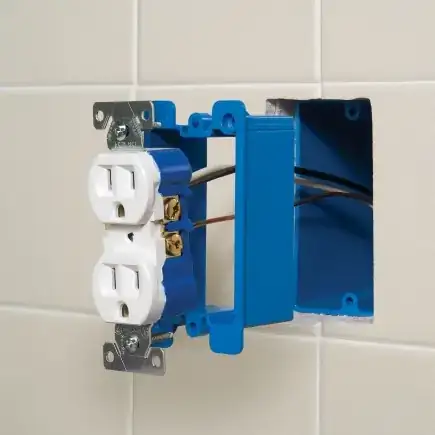
If you can get enough extra distance out of those, then you can tile right up to the edge of the electrical box. Here's an example of an outlet that has been set to protrude a bit outside the box:

proud electrical outlet

Note that you should tile around the edge of the box - don't tile right up to the edges of the receptacle within. This way the receptacle can be accessed if needed. The faceplate will cover past the edges of the box.

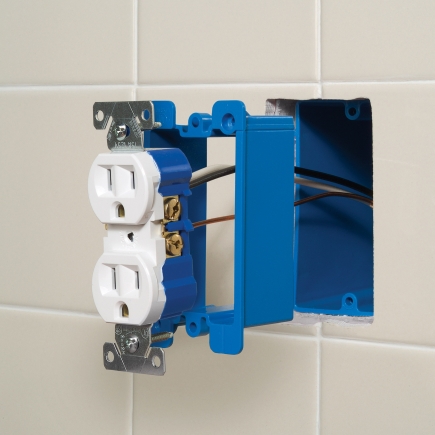
If your tile layer is too thick for this simple approach, you may need to move your electrical box out. If you have old work boxes (the kind that are installed by clamping or screwing into the wall), you may be able to loosen them and re-mount them once you've tiled. If your boxes are fastened to structure, you won't be able to adjust them - you'll have to cut them out and mount new ones. Because you're redoing the wall surface, this isn't a huge deal. But there is a shortcut available, the electrical box extender:

electrical box extender

As you can see, that's designed for exactly your case. It's preferable to have a properly mounted box, but when that is not practical this gives you an easy alternative.

Shimon Rura
  • 8,312
  • 6
  • 31
  • 46
3

You want your outlet straps to be either sitting on the tile or level with the tile. The physical part where you plug something in should be fully extend past any cover that you add.

Steps:

  1. Turn off power to those outlets. (or leave power on, let electricity travel through thinset and trowel, shock you and then trowel jumps up and you have a permanent scar on your thumb)

  2. Unscrew the outlets from box.

  3. Install tile.

  4. Add in spacers behind your outlet mounting straps.

enter image description here

  1. Test out depth of outlet with tile. I suggest also screwing in the cover. You may need longer mounting screws but most new outlets have very long mounting screws and this usually isn't an issue.

  2. When you are done your cover should lay flat on tile and outlet should protrude at a normal depth. This isn't an exact science, and you can eyeball the need for more spacers or less spacers if your cover doesn't go on.

Big blue sells the neon ones and big orange sells these black spacers.

DMoore
  • 50,637
  • 16
  • 93
  • 208
2

We opted for longer screws.

When we decided to tile our kitchen, we made these decisions along the way. We're both creatives and are usually adept with making educated guesses that turn out beautiful in the end.

Our inexperience tiling on a vertical surface (with outlets) resulted with the jagged edges around the box. Thus, we created our own switch plates. I made them larger to hide the imperfections and the result is stunning. enter image description hereFinal Result

Lisa
  • 29
  • 1